Mountain sleds are also useful to access remote mountain top radio sites, therefore, this entire training will be for mountain sleds and riding techniques. While there is a limited amount of equipment and other items that can be carried on a sled, a simple scouting trip, or simple repair (replace that fuse) can be effective and timely. Also, trailering sleds are generally easier than (heaver) snowcats.
Mountain Safety
Riding in the mountains is very different than on flat roads and trails. In many cases you will be dealing with deep snow, slopes and foul weather, including winds and poor visibility. Some of the pictures and videos you might have seen in the past were "kids" (wild adults) playing in the extreme sense for recreational fun. While the techniques covered in this training bear some similarities with these "maneuvers", they are only to make you aware what modern sleds are capable of doing and not to push yourself far beyond your skill level. Some of the pictures that will be presented here show techniques beyond normal maneuvers, however, can be performed relatively safe, with sufficient practice. Some of them can be covered in the optional field training. The important point to remember is they are not what you are expected to do, rather what you can do, should the need arise to deal with a situation. It's safer to have the knowledge and practice should you need to use it to get yourself out of a potentially dangerous situation. Mountain riding can be more physically demanding from trail riding, so practice and being in shape helps greatly. More on riding, later.
Engine overview
Snowmobile engines come in 1,2,3 or 4 cylinder, both in 2 and 4 cycle and both in air or liquid cooled operation. Most mountain sleds utilize a twin cylinder, two cycle, gasoline, liquid cooled engine. Displacement-wise they range from 300~900 cubic centimeters depending on number of cylinders and performance type. Two cycle engines do not use an oil sump like 4 cycle engines do. Therefore, they depend on the oil coming in with the air/fuel mixture for lubrication of the rings, and bearings. There are two ways used to accomplish this. While some manufactures have the operator mix oil with the gasoline, most design in an oil pump that draws from a separate tank and injects oil into the air/fuel mixture. Because this oil is burned up in the combustion process, sleds do smoke to some degree out the exhaust. During engine break-in it's recommended that the oil mix be increased (even more) by adding more oil in the gas tank, for the first tank. Details are with the owner's manual. During this period the smoke will be rather heavy. Both of these conditions are normal. The burning of oil also causes spark plug fouling, therefore, the plugs need to be replaced occasionally. The replacement interval can be as long as 6 months or shorter under constant use, but plugs can foul anytime, so spare plugs should be carried and are usually stored in the engine area, sometimes in a separate tool compartment. Snowmobile engines in general are designed to operate in ranges of 7,000 rpm, and even higher, depending on the specific model and setup of the sled. There will be more discussion on this subject later on. The left and right side of engine area are referred as the "PTO" and "MAG sides, respectively (looking forward). Another way to remember this is the fact the clutch is the "PTO" (Power Take Off) and the "MAG" is magneto (for power generation). However, as technology advances this arrangement may be different in future sleds.
Two cycle engines currently have a great power to weight advantage as compared to four cycle engines, although as technology and environmental issues continue, four cycle engines may have a part of this in the future. They are already being utilized in trail sleds, in some areas of the country. Here's a few words about bystanders and public image. Two cycle engines, at first impression, appear to be dirty, polluter, however, when you look at the big picture and look at the facts and figures, these little engines pollute far less, then compared to a 747 jet taking off, many times a day, or the millions of automobiles and trucks. We have a much large issue than these little engines. Fossil fuel issues, being a highly controversial subject, we will stop here and continue with the training at hand. The reason this is mentioned is in the event someone were to ask why we use them.
Most of this documentation will be based on this sled, being the model used at the Author's work place in the 2000's. Future sleds to be purchased may have a variance in features, therefore, it's possible some notes in this training may not apply to them. However, the information here can get you started in the right direction.
While the basic engine is Suzuki brand, from Japan, most of the surrounding components and other sled parts are built, assembled and tested in the Northern part of the U.S. For this model, engine performance is controlled by the ECM (Electronic Control Module). The engine is electronically fuel injected and operates at a max RPM of 8,200. (Larger engines operate at slower RPMs). It operates on normal regular gasoline, (non-leaded, octane of 87). (Other types of engines may take higher octane). For best performance at all rpm's, this brand uses "power valves" on the exhaust system, which open at rpm's above 6900. It has oil injection from an oil reservoir which lasts around 200 miles. There is "low oil" light provided on the dash board, however, it's best to top off the oil when refueling as a precaution. Running the engine without oil will destroy it. In an emergency you can use any 2 cycle oil on a limited basis to get you home. Extended use of mixed or non-synthetic oils will eventually create problems with the power valves and other areas. If you get caught in this situation, drain the oil and start over with APV (Arctic Power Valve) oil, which Arctic Cat recommends to avoid warranty issues.
This model uses a 3-way ignition "kill" system, which is a normally open arrangement. What this means, is a short (to ground) from any of the three control points will signal the ECM stop the engine ignition. These are the key switch, the red button on the handle bar (right side) and the (optional) tether cord, that attaches to you, in the event you should fall off the sled unexpectedly. These sleds are reliable, however, once and a while an ignition problem might occur. In that event you should remember the control arrangement. One common example is the throttle limiter switch (fourth source). To prevent a runaway engine there's a switch inside the throttle lever area. Read your owner's manual for the details. The point is, in an emergency if one of these devices fail you can unplug it to get you home, since it's a normally an open system.
Engine Performance
These next several paragraphs get very deep into technical areas of the sled. If this does not apply to you, move on to the "Drive Train" section
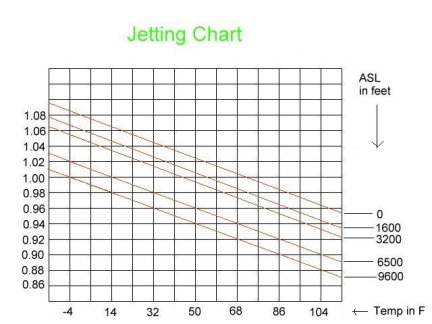
Air/fuel mixture is very important for a two cycle engine to run at good performance levels. Altitude and temperature effect air density, and therefore, affect the mixture. A rich mixture runs the engine cooler, while a lean one runs it hotter, with an increase in power. One way to check this is by inspecting the spark plugs end color. They should be a medium dark brown. Very light or white is bad (too hot). Another way to check mixture is by piston wash, better known as "jet wash". During combustion the (injected) oil will burn and leave some carbon deposits on the piston tops. There is some variance between natural and synthetic oil deposits on the pistons, however, the effect is similar. The intake port routes the air/fuel mixture (and oil) into the combustion chambers (cylinders). Just before combustion the unburned gasoline has two (desirable) effects on the piston tops. One, it has a tendency to cool the entire pistons tops, plus, in a concentrated area (such as the intake) it further prevents additional oil from burning in those areas. Gas also does have a tendency to "clean" an oily surface, even when burnt, therefore, the gas "washes" the (previously deposited) carbon off the top of the piston top area(s) them, leaving the area shiny clean, thus, we call this side affect piston wash. We can use piston wash as a good way to determine air/fuel mixture, because of the operating temperature in the combustion chamber. For good performance, yet, protection from meltdown, the piston wash should be around 10%, meaning, 10% of the carbon deposits are washed away by the gasoline, while the remaining 90% has carbon left on the piston tops. Enriching the mixture ("fat") will increase the piston wash, which is "safer" (cooler), however, reduces engine performance and fouls the plugs. If the mixture were too lean, the carbon coverage on the piston tops would be excessive (100 %) from the heat buildup, and the pistons would eventually melt. For carburated sleds the owner/rider would need to adjust for this happy medium, by changing the jetting sizes inside each carburetor.
A jetting chart, such as the one below, shows that the numbers on the left edge are the jetting change factor depending on the relationship of altitude and temperature. After studying the chart you can see, "normal" (no temperature inversion) higher altitude has thinner air, however colder air, which counter acts the first variable somewhat. Sleds with EFI have the ECM (located in the engine area) to compensate for changing conditions and provide the correct mixture at all attitudes and temperatures. At this time it's not published how Arctic Cat does this; whether the computer changes the timing or duration each injector is open per cycle. The picture on the right, the head was removed on one cylinder, showing around 15% of jet wash is about the right combination of safe/performance.

Some larger cities supply gas with alcohol and other additives, called oxygenated fuel, distributed during the fall and winter months, in North America. Using oxygenated fuel has the same affect as leaning out the mixture. Therefore, if you use this type of fuel, you must unplug the fuel selector wire. It's on the EFI module, located under the hood, in the tool box compartment. The owner's manual will show this in better detail. This changes the EFI mapping to compensate for this type of gas. If you run oxygenated fuel without doing this you may burn up the pistons, due to a lean mixture. In the reverse situation, if you run normal fuel with the selector unplugged, the worst that can happen is you might eventually foul the spark plugs (double rich effect). The owner's manual claims running in this condition would damage the engine as well, however, after a little research and checking with a few experienced dealers, this doesn't seem to hold true and perhaps is the built-in "safety margin" that the manufacturer figures in the design. If you are concerned about warranty issues (manufacture's "blanket" disclaimer) then follow the manual. These engines are tough and when not abused last several thousand miles. However, all moving parts are subject to wear. The most engine wear items are the pistons, cylinders and bearings. More on this subject can be obtained by clicking here .
Most reputable gas pumps containing oxygenated fuel will have a label to that affect. Pumps can have a small amount (around 2%) and not required to have a label. One test to perform is put a sample of the gas in a little bottle and add a couple drops of water and give it a shake. Since water mixes with alcohol it will "disappear", showing a test "positive" for oxygenated fuel.
Advanced Information
Most two cycle engines use an expansion chamber in the exhaust pipe. This is to produce a very clever and highly technical "sonic super charging" function. The exhaust gases produce sonic (sound) waves that are bounced (reflected) back from the angled walls of the exhaust pipe back into the exhaust chamber at a critical time to super charge the combustion chamber. An animated picture further explains this function. Since this is a function of the speed of sound this occurs in a narrow R.P.M range thus, producing a great increase in engine horsepower curve when potting against rpm. This "Power Band" (curve) typically is 400 rpm wide, ranging from 7000-9000, depending on engine size and design. For example, most 600 engine's power band is 8000-8200 rpm. Larger engines, such as the 800s are lower, say, around 7300. Again, this depends on the brand and design of the engine. Even though the engines are capable of turning faster, out of this power band has no advantage, and even a slight disadvantage, since this would increase wear on the moving parts, such as the pistons, rings, and bearings. Some recreational or performance riders modify their engines by changing the exhaust pipe to move the power band up several hundred rpm, and increasing the horse power. Turning faster will shorten engine life and possibly void the warranty, therefore, for this training it's not recommended for any such modifications.
The rider does have reasonable control of lower rpm for maneuvering around trees, loading and other slow moving operations. During a climb or other high demanding terrain the rider typically needs maximum power, at times. Because of ever changing surface conditions it would be extremely difficult for the rider to keep the rpm within this power band. A WOT (Wide Open Throttle) condition would over-rev the engine. There is an effective way to address both these issues, with transmission/clutching.
Transmission
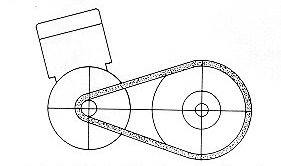
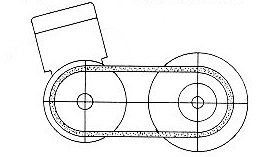
Our next discussion is probably the most mis-understood part of a snowmobile, which is a Continuously Variable Transmission, or CVT. The engine crank turns the primary (drive) clutch, which has movable sheaves that squeeze a "V" type belt which transfers the power to the secondary (driven) clutch. Both clutches have angled sheaves, so by moving the belt up and down the sides continuously changes the transmission ratio. The figures below illustrate this. The figure on the left shows in the idle (or off) condition, with the belt at the smallest radius on the primary clutch, and the largest radius on the secondary clutch. As the rider increases the throttle (and speed) the belt moves up on the primary and down on the secondary as shown in the right picture. In this case when the CVT is fully shifted out both clutches are turning at the same speed, (1:1) typically around 7,000-9,000 rpm (depending on engine size and design) during a WOT condition. (Wide Open Throttle).
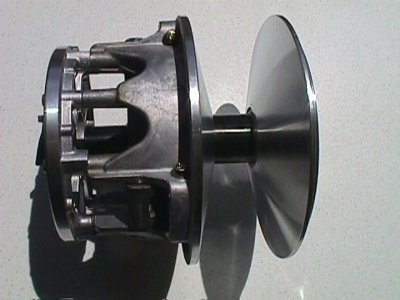
In the primary clutch there is a coil spring keeping the sheaves apart, thus in a dis-engaged condition. There are many different spring types, with "strength" ratings calibrated in pounds of force to collapse them. Ratings given are engagement and fully collapsed condition. (Perhaps even a pressure curve could be incorporated in the future) This is accomplished by using different types of metals (perhaps alloy combinations), number of turns and size of the coil. Just in case you were wondering the picture shown is without that spring.
The primary clutch also has several fly weights, which are curved and pressed on small rollers mounted on the "spider" which is part of the other half of the primary clutch. Due to the centrifugal forces of the clutch turning, the weights move the sheaves together, thus an engaged condition, typically starting around 3500-4000 RPM. As you can see, it's a balance between the spring and weights. Several combinations of the spring and weights affect the engagement and operating RPM.
Two cycle engines have more horsepower than torque. Increasing the engine load keeps the RPM down, even under WOT conditions. Therefore, it's relatively easy to control the maximum RPM with the correct spring/weight combination. By controlling the primary shifting causes constant load on the engine, thus limiting the RPM under WOT automatically, so the rider does not need to be concerned about over revving, while steering and otherwise handling the mountain slopes.

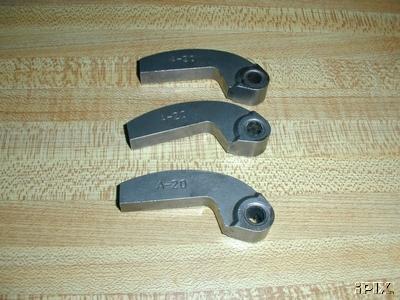
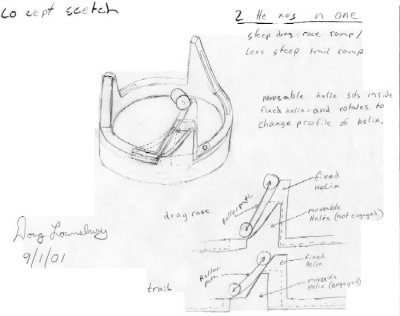
The secondary clutch has a coil spring, similar to the spring in the primary. The sheaves are coupled to an angled set of surfaces, called the "helix". Helixs can be a single or multiple angles. Several different combinations of the spring and helix provide control of the shift-out of the secondary clutch. The secondary controls the speed and power applied to the rest of the drive train. As more power is needed when slowing down or climbing a hill the secondary down-shifts to provide that demand. One could say the primary clutch is RPM sensing (centrifugal) while the secondary clutch is torque (load) sensing. To a small degree one clutch shifting affects the other. Higher attitudes cause the engine to loose RPM (and performance). To compensate, lighter fly weights can be installed in the primary clutch, per a chart either in the manual or in the engine compartment. They come stock with mid range weights which should be fine for most riding, such as at work, for utility trips.
One more item should be made aware of concerning RPM. The discussion we just covered is based on a "load" for the sled's drive train. The drive belt does wear out relatively quicker than the other (metal) parts of the drive train. Typically, you can get about 700-800 miles per belt, depending on demands and operating temperature. For example, two factors are very hard on belts, which are constant hill climbing and warm (spring conditions) operating temperature, both which create a lot of heat on both the clutches and the belt. One more factor usually from a "newbie" rider is "babying" the throttle, with the thought of creeping up through the trees or some other tight area which may be intimating to that person.
Normally when the belt fails it will starting coming apart in pieces or shreds. You may be able to hear and feel this condition, as a "thump-thump" sound or an irregular feel to the otherwise, smooth acceleration of the sled. When you experience this, the best course of action is to stop on a level spot and check under the hood. At this point it's a fairly easy task to change out the belt with the spare, usually kept on the belt guard that covers the clutches. Rarely, you will not have any warning of a complete belt failure, when the belt will break completely in half. What normally happens you'll hear a "bang" and "clank" which is the sound of the clutches disengaging violently without a belt to separate them. Also, at this point there will be no load for the engine, therefore, is possible to way, over-rev it. You will lose all forward power and control so trying to continue keeping the throttle open will do no good. In fact, it's It's imperative you let off the throttle immediately . Failure to does this could destroy the engine. In some cases a belt breaking apart has enough force to crack the belly pan or even bend the (metal) foot well if they are in the line of "fire". This was witnessed by the Author. Take this into account if you are performing a steep high climb or some other demanding situation. Don't be afraid, just keep this in the back of your mind as an emergency plan on what to do. In the worse case scenario you would have to let go and jump off the sled and land in the snow. In most situations the sled would just stop in the snow, especially if it's deep, power type. However, if you are on steep well-packed slope this could be disastrous for the sled, tumbling down for destruction.
If you have a burning desire (and for maintenance) to observe this clutching action you can lift the rear end of the sled and run the engine with the clutch cover removed. Remember, with this arrangement the track and engine will NOT have the proper (snow) load, so you would be able to over-rev the engine, once shift-out occurs (1:1). You must observe safety precautions, such as a sturdy lift, a cushion on the front end and a high degree of eye protection. With things moving this fast a mishap can turn into a explosive piece of metal. Tachometer calibration can be performed with this arrangement as well, except the shield can be in place.
Drive train
The secondary clutch turns a "jack" shaft, which transfers power to the right side of the engine compartment (MAG side) to a top gear, chain and bottom gear. The chain and gears are inside a sealed case, in an oil bath. The bottom gear is much larger than the top, thus providing reduction. Typical gear pairs have 40 teeth on the bottom gear and 20 on the top for a ratio of 2:1. Another way to look at this is that the top gear makes two turns for every single turn of the bottom gear. The bottom gear turns the "drive" shaft which goes underneath and inside the track "tunnel". The drive shaft has track "drivers" on it, which pull the track around and provides forward traction. These drivers typically come in nine or ten "teeth" diameter. The entire (final) transmission ratio is based on both clutches fully shifted out (1:1) the top and bottom gear sizes, and the driver's diameter. For most mountain climbing a good final ratio is 2.15:1, however others can be used, depending on engine size (and power). This is the best compromise between ground and track speed, discussed later.
Older sleds of 1960-1990 era generally supported the entire weight of the chassis with "bogie wheels" on mini-axles, consisting of 6-8 sets. These wheels would roll on the inside of the track. Very similar to bulldozers. Recently the amount of wheels has been reduced, thus much of the chassis's weight now would rest on a set of rails as part of the suspension. Sleds later than the 1990 era only had 4 wheels with most of the weight on the inside of the track. There would be way too much friction for the (metal) rails to contact the inside of the track directly. Therefore, plastic "sliders" are mounted on the bottom side of the rails. The inside of later tracks now have metal clips. These clips come in contact with the sliders, also called "hyfax". The hyfax's depend on snow being picked up by the track lugs and being thrown into that area for lubrication.
High performance engines are liquid cooled. One or two heat exchangers are normally mounted up, inside the chassis tunnel. These exchangers depend on the loose snow being kicked up from the track for cooling. Therefore, you should try avoid riding a long distance on icy or no snow conditions. Try to ride where there is some loose snow for the track to kick up into tunnel and sliders. One trick the Author does is stop every so often and kick some snow into the track and tunnel by hand/foot. Another way is to install "ice scratchers" that, when lowered, provide a spray of ice flakes to do the job. Continuous runs without any snow, say, less than a quarter of mile, and at slow speeds usually will not wear the hyfax out. While it's not expensive to replace the hyfax, the engine is, if you let it over heat due to lack of (snow) cooling. Below is a (crude) picture made up of a typical sled drive train.
Skis
While talking about items that are subject to wear, we should mention the snow skis. The sled front end's suspension ends have skis, in which to steer the sled. These skis are normally plastic to provide a light, yet durable way to travel on the snow and provide steering in powder snow. For hard pack and ice, the skis also have metal "carbides" which are strips with sharp metal edges. These work similar to ice skate blades, and are prone to be worn down, if you ride on dry payment and other abrasive surfaces. Sometimes (in the spring time, for example) this is unavoidable and considered part of the normal wear and tear to get to your destination. Try to find snow or ice whenever possible to minimize the wear on the ski carbides.
As you've read so far is mostly theory on the sled's workings. When you actually do the real thing, you will learn some things along the way. This is the second part of the Author's training program. It's assumed you are experienced in winter driving and trailer pulling, backing up, tuning around limits, attaching and un-hooking the trailer for storage, etc.
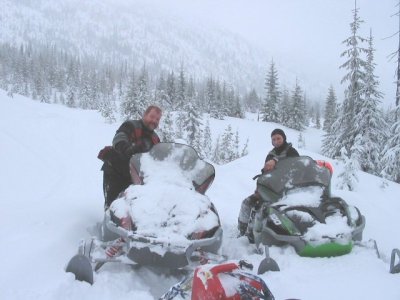
Most of your sled riding on the trails will be sitting on the seat. Most of unloading, loading and hill climbing will be a combination of sitting and standing. This can be a physically demanding chore, however, with practice and experience you will learn ways to lesson the burden, and perhaps even enjoy the ride. A normal routine for a trip to the mountain site would be to drive to the storage place, hook up the trailer to your vehicle, check out the lights, etc. This is also a good time to check the sled for anything defective, loose items, and all fluid levels. Typical riders gas-up during the drive to the mountain. Then arriving at the snowmoblie parking lot or other designated area to meet your other riders and unloading your sled.
You can start the engine either with the battery starter or the pull rope. This is also a good time to listen for any unusual sounds coming from your sled. Being fuel injected, they start up quickly as compared to carburated sleds. Proper warm up two-cycle engines is extremely important. They have tight tolerances and ring and cylinder damage can occur with improper operation. In the event of damage, can show up later in the season. For unloading off the back of a pickup truck with a ramp you can start your engine on the ground. Or, if you have a "drive" on "drive" off trailer you can start your engine on the trailer. During warm-up you can get "dressed" or other preparations for you and your partner(s). For trailer operation, a few minutes later you can run them off the trailer's front ramp and continue to warm them up for a few more minutes. The author's preference is to run them until a little warmth can be felt on the rear heat exchangers, indicating the coolant is circulating. Idling them does increase belt wear a little, however is a trade-off for proper engine warm-up before running down the trail, especially, on WOT condition. In the case of a modern/current sled that has reverse, you should still warm up the engine a little before backing down a sled deck.
Speaking of belt wear, it's best to "feather" the throttle some to move around. Slow "crawling" is hard on the belt. As you (presumably) read earlier, sleds do not have the "luxury" of a torque converter, like in the LMC and Tucker SnowCats, you might have operated, rather the sled's transmission (CVT) made up of belt-wearing clutches that work less efficiently, especially at start-up and low speeds. In other words "babying" does not help. The throttle is your "friend" so remember to work on it. This is also true when attempting to get around tight spots.
When getting around tight spots, the sleds can work on the "fish tailing" principle. Be somewhat aggressive in working the throttle. No, this does not mean to be wild and unsafe (for work trips) just that "babying" it sometimes won't get you where you want to point the sled. So by feathering the throttle (punching it some) you can cause the track to spin and slip, thus kicking the rear end around. Theory discussed here is not as effective as riding in the field (for that part of the training), and will take lots of practice, depending on your physical abilities. Some short power bursts will work well, while keeping your speed down. If you have concerns about the sled getting away from you (due to a mechanical failure) you can attach a tether, supplied on most sleds. As you (presumably) read earlier this will "kill" the ignition.
Sidehilling: Another tool
While on the trail, occasionally, you will come up to a tree or other large object blocking your path.
If you see something like this coming up stop before the spot, in case you need to turn around.
While evaluating the situation with your companions, you have two options;
1. To "build" a bridge on the leading and trailing sides of this obstacle, by shoveling a "snow road".
This option works fairly well when there are several riders, with several shovels and there's no other way.
This does, however take time and effort.
2. To go around it. In the case of a trail with banks on either side this requires a special maneuver.
Since most trails are cut into the hill (going across), there's a side bank, sometimes with heights from 1 to 8 foot, or even greater.
Many times you can "jump" these banks. Most trails do not give you enough "room" to get a run at it straight on.
Therefore, you need to take this (bypass route) side bank at an angle, called sidehilling.
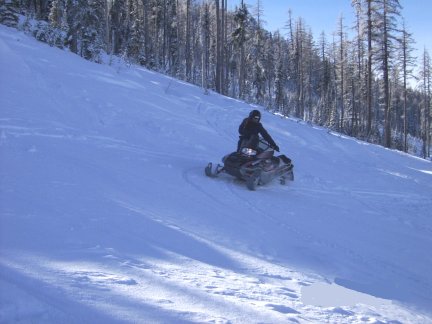
You you need to practice sidehilling first. Practice leaning over, while not fearing if you roll your sled over will be a major learning (and unlearning) issue in your whole training. Start by finding a safe, flat area, such as a (well-frozen) lake or some other open area. For safety, do this in the presence of others nearby. Practice pulling it about a 45° angle, on it's side, or wherever the "balance" point is, depending on the center of gravity for the sled's model you are riding. While doing this go forward and practice maintaining this position as long as you can. Keep your speed slow for starters. Even a few feet will give you the idea. When you become proficient you will be able to keep this angle for much greater distance. As you become more proficient, you can start practicing on a small side hill and working up to higher ones. Remember to keep your weight UPHILL, otherwise you'll end up rolling it downhill. Recreational riders actually look for sidehills to do this; to them it's part of the fun of riding. For your utility purposes this allows you to take alternative paths.
This method works very well for sidehilling in deep powder, where you would not be able to take the hill straight on. By working the throttle and your weight you can direct the sled in the uphill direction you wish to go. In this case, the skies will be doing very little steering. Most of your turning will be with shifting your weight and working the throttle. This maneuver has another advantageous side effect. Say, for example you have to cross an open face, say around a 30* angle or less. By leaning into the hill and gunning the throttle to spin the track you also grind away a "path" that's fairly level for the less experienced companion's to follow in the tracks. In an extreme case (or with pulling a trailer) several passes will flatten out this new path, along with several people shoveling out the high points. This new path can be almost as tame as the trails (in the lower elevations), you can cross this path safely, even with trail type sleds or pulling a pup trailer with equipment in it.
In hard pack conditions you will not have the advantage of "sinking" in the powder to "level" out your assent. It still can be done, however, you'll need to emphasize keeping your weight on the uphill side. As you come around your turn, and become pointed downhill, you then need to move and keep your weight centered over the sled by either straddling or sitting. In the left picture, the person is working on this technique. Hard pack also presents another problem on sidehilling to the left, since most sleds only have one throttle.
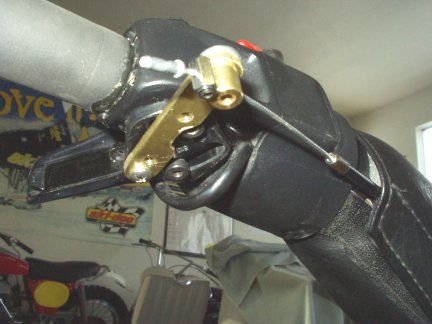
Dual throttle
When the uphill is on your right side you can easily reach the throttle flipper on the right handlebar. When the uphill is on your left, it is much harder to reach across to the throttle, but it can be done. In this situation it's much easier to have a dual throttle (after market) "lefty" kit installed. That way you have easy access to the throttle from either side. The right side coupling is shown in the right picture. The left side will have either another paddle or a bicycle type "brake" handle coupled to the main throttle on the right side. Remember you still only have one real handle, (for the real brake) which is usually on your left. There have been some issues with recreation riders grabbing the wrong lever on the left side especially, during loading at the end of the day. Let your imagination run with this one!
The main points to remember these tips are not cast in concrete, as so to speak. Having the knowledge from this document is helpful, however, you will have to do the actual thing (riding) to really get the idea. By "feeling" your way (and abilities) with lots of practice will help you to handle riding in rough terrain. This will take more than a couple of trips to the site to become proficient.
Older sleds were lighter (around 300 pounds), and when going up hill in powder snow, one could pretty much stay on top of the pack while breaking a trail. Just before the sled would sink (and get stuck) the rider would "turn out". This means the rider would turn out of the path, around and back down the hill into the same track (or next to it) as going up. By going down the same path will pack it down for the next run up hill. From the air, this would look like a lolly pop in the snow. The rider would then swing out of the way for the next rider coming up the hill. The next rider then uses the broken/packed trail to gain traction and speed (within reason) and "leap frogs" the first rider's turn out; goes as far possible, turns out and gives it back to the first rider. Continuing this process gets the group up the hill. It's a art of balance, speed and flotation.
Modern sleds are larger and heavier (weighing 500 pounds or more) from extra features and technology improvements. These include such things as liquid cooled, larger engines, much more power (some stock sleds are 100+ hp) and larger skis and tracks with deeper lugs (such as 2") in the form of "paddles". These sleds have fantastic performance, and can access areas that were impossible a few decades ago. In many cases, the longer tracks and "brute force" power overcome the hill, up to a point. This comes with a price, starting with the need for greater operator skill and physical condition.
Remember the three factors for climbing in powder:
All the power won't do any good if you don't have any traction and momentum. In the deep snow those two won't happen without sufficient power. Use all three of them to your advantage; use the power to get momentum; that will help supplement lost traction. When any of the three elements start to run out; plan to turn out of your climb (for another try).
As earlier mentioned there is a compromise between ground and track speed while climbing in deep powder snow. For deep powder, modern sleds have enough power to keep the track spinning fast enough to actually "build" a road underneath and stay on top of the pack, up to a point. The track's paddles bring some of the loose snow back around to underneath the sled, throwing it back down on the path. Sometimes you'll see loose snow in the trench from a snowmobile climbing a hill. The rest of the snow is thrown from the centrifugal force, and packs in the sled's tunnel, and eventually gets scooped around the same way.
One of the reasons trail sleds do not do well in powder climbs, because of the low clearance of the tunnel's running boards. Running boards are necessary to stand on many times for mountain riding. Mountain sleds have a much greater clearance for greater vertical travel of the track to tunnel area. If the slope exceeds the capabilities of the rider and/or sled there comes a point to where the track will dig down and "trench" and get stuck. Even though the running boards are higher there's a limit to trenching when they come in contact with the snow pack, thus taking some of the weight off the track and causing a high-center effect.
There's a few methods to prevent this condition. Know your sled. When you feel about to get bogged down (stuck) turn out of the climb early, as described for the old, lighter sleds. If it's in deep, soft snow, jump off the sled, just before you let off the throttle. The loss of your weight on the sled and it still moving forward will cause the track to come up out of the trench a little. This will be a large advantage to getting out and going again. This is especially useful if you get into a tight area, such as dense trees. If you didn't trench very much and the snow is light you can relatively easily pull the front end around and point it either straight across the slope or slightly down the hill. However, if you are on hard-pack do not jump off as your sled will tumble down the slope and get severely damaged.
The trench, your friend:
In some cases, stopping on top of the pack will not be possible or even desirable. The trench can be your "safety" friend as well. For example, climbing a steep slope can be a big problem if the sled starts going backwards down. In another example, during extreme sidehilling, if you mis-plan your path and the slope overcomes your ability to keep the sled level; the sled will want to roll downhill. This scenario is probably one of the most dangerous situations to be in, because you'll most like end up with the sled rolling over you, with it running. If you choose to "dig in" and trench the sled completely, you probably will be "locked" into the snow pack. This is a safe maneuver, however, will take some work to get unstuck.
The third example is if you are stopped on a steep hill to get off and help some one else it's best not to rely on your sled's parking brake entirely, because the sled still could start sliding downhill, with the track locked up, especially in spring-corn snow. If you need to do this, trench only a little, preferably pointed across and/or slightly down hill. The trench alone should safely "park" your sled and act as the brake. When recreational riding in the extreme sense, the Author has used this method on several occasions for all of these reasons, and some. If you do use your sled's brake, remember to release it before headed out. If you forget you'll burn a flat spot on the belt in 2 seconds at the typical cost of $55 for the model discussed here or much higher for others. If you do trench it deeply, don't worry, since you have some options.

The trench, your annoyance:
When you get stuck, turn off the motor and plan your next move. When the snow is light and powdery you can pull the front end around. Pull on the skis, rather than the front bumper. This gives you greater leverage, since the ski loops are further out in the tangent of the pulling circle. When the snow is heavy pulling the sled around is not possible at this point, due to the track being in a trench of "concrete" like snow. Therefore, you need to get the track out of the trench, first. You could use your shovel to dig out a large area and a path. Or try some group maneuvers as well.
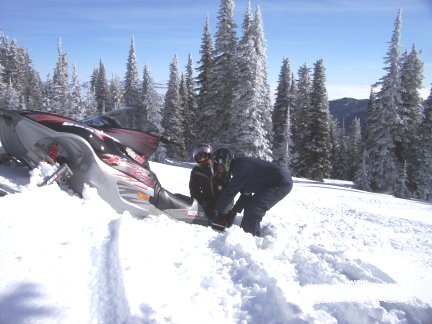
As shown here (above) with enough people you can pull the rear up and over, out of the trench. Most sleds have a rear bumper/handle for this purpose. For two people, it's rather difficult, but can be done. Three is much better, especially for everyone's back. In the picture shown, the person on the right is not correctly positioned for the lift. This was posed, because the photographer was the third person. All three should lift together "on the count of 3", that way each person does not strain. Never lift anything heavy with a bent back. Use your legs or arms. Also, do not "jerk" the bumper because some sled designs have weak bumpers and then can be ripped off with too much jerking force.
In an extreme case a couple of partial rolls will loosen things up to make the lifting easier. When track is "locked" into that "concrete" like snow, one can pull the sled over and rock it from side to side a little to help from your group to break up the trench. Use a combination of the mountain bar with the others lifting one side. Repeat this a few times. This also has another advantageous affect. If the sled is not too high-centered (held up by the running boards) this will pack down the snow under the track, enabling it to "hook-up" for traction to get out of the stuck spot. If you are alone (got separated from the group) this is especially a back-saver and may be one of few, options. In an extreme case you could pull the sled over to a point before it starts to roll; say about a 45* angle. Pulling it over will most likely pull the track out of that concrete trench, plus the front part of the sled now will be going across the snow on a wider, friendlier surface of belly/body of the sled.
When you pull the track out of the trench, kick some snow in the hole to build up the area for the track and pack it with the previous method. At that point the rider usually can start up the motor and power out of the remaining hole, especially if the another gives a little pull on the ski's front loops. Have them pull on the ski at the same time you feather the throttle (don't spin, yet) so it starts to hook-up. If it's a real "doozzy" inch you way forward, then let off the throttle, to give the others another stepping position to pull on the skis again. The point is not to start spinning at this point; that will only trench again. Once you are on a level or downhill path and start moving you can get on the throttle more to pop out of that stuck spot even if you start to spin the track; just keep moving forward and don't stop until you are out.
If it's really deep and steep one can pull the front end around (again using the leverage of the skis) while the other keeps the sled from side rolling, by staying on the uphill side of the sled's running board. For further leverage to stabilize the sled from rolling over, one can stand on the track edge while the other(s) pull the front end around to a stable position on the sidehill. Obviously, one does NOT stand on any portion of the track if the sled's under power and moving. Try a low position (back more straight) with little stepping type pulls or jerks on the ski (only). The bottom line is to use your brain instead of just muscles. It will make the day ride much more fun and safer.
Safety in numbers.
Speaking of general safety, you should always have buddies with you; at least one, perhaps two. If you are alone and get stuck you still can get out, however, takes much longer to do safely. Remember, don't get frustrated and strain yourself; that will make the rest of the day miserable or even dangerous. If you are alone the methods previously discussed may not work for you. In this case you'll need to shovel out the area, with a path in front of you in the direction you plan to get out. Stomping around the snow packs it down as well, especially in warmer, wet conditions.
All of this greatly depends on your physical condition. After one or two incidents you will have a pretty good idea what you can get yourself in and out of. If you ride enough you'll occasionally run into a situation that seems benign (at the time) but can have more serious consequences. Remember to plan your route, while in the trees. One example is a tree well. If you get caught in a deep one, you'll be faced with getting a 500 pound sled out of a hole!
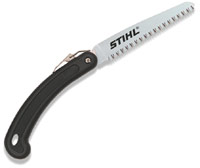
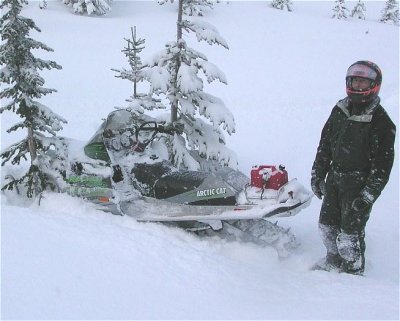
Another example of a benign situation is riding in the trees and not planning your route, with no way to go forward or turn around. When in the trees remember what your ski stance is (widest part of the sled) to avoid getting jammed in between two trees. Normal stance is about 3-4 feet. Sometimes you may "miss" clearing a tree and only get one of your skis hooked on a tree. Most older sleds don't have reverse but the newer ones may have it. Even the ones that do, generally get stuck before backing up enough to get out of this predicament. If the tree is small enough you could cut it with one of those neat little folding saws. If the tree is very large your only option is to pull the sled backwards. This is almost an impossible task solo. Another option is to carry a small ratchet/winch to anchor on a tree behind you to pull backwards.
Was this picture staged? Embarrassingly, no. The Author did have another buddy to help pull the sled backwards, enough to clear the ski in the tree.
Sometimes a rider will miss a turn on a trail, due to excessive speed and/or ice and go off, down a bank, sometimes way, down in the trees, with no way out. Or perhaps an equipment failure, such as the steering post. The Author has come across two riders in the past 20 years, where it would be impossible for even 3 people to pull a sled back on to the trail. Here's a cool trick. Assuming you've brought some strong rope, turn the disabled sled on it's side and tie the end of the rope to the track, using one of the "windows" of the track. Next run the rope , in the path of the recovery, normally uphill towards the trail, to a nearby tree. Restore the sled level, start up the motor and climb up the path of the rope; the rope will tighten and provide good enough traction to get up. Yes, the rope will go around the track and be careful not to get it jammed on either side; try to keep the rope in the center of the track. For long recovers you may need to repeat the process several times; where you need to stop the motor, secure the sled (from going back down) and unwind the rope around the track, re-secure, then shorten up the other end around that tree. Repeat as necessary to get the disabled sled back on the trail. This task can be performed with one person (in an emergency) however, is much easier with more. Remember, having a cool head and taking the time to get out is far better than panicking and trying to walk out. In some cases, walking out in deep power without snowshoes can be lethal, especially for the inexperienced. Safety in numbers.
If you can turn out before trenching and swing around and back down this will save at lot of work for you. For recreational fun this is even done on purpose, called "hymarking". This maneuver has a utility (work) advantage, for obvious reasons (no digging). Remember to shift your weight on the uphill side of the sled as you turn out, especially if you are going slow. You can power out of a turn. If you keep your speed up (or even slightly increase) the sled will have less tendency to roll over downhill. This will be an unlearning (and unnerving) challenge for you, since the natural reaction is to slow down when "in trouble".
WARNING !
If you don't learn this maneuver properly and get "scared" and slow or stop before pointing downhill, you are very likely to roll your sled over (downhill). After you fall off (downhill) the 500 pound sled will roll over you (most likely causing injury) and continue rolling down hill, damaging the sled as well. Your $10,000 new purchase will be converted to a $1,000 garage sale. And to the fact you may have to walk out, if you are lucky to survive being rolled over. Therefore, practice on safe "little" climbs many times before doing the big stuff. This may take several seasons to get it right.
Once you swing around and point downhill you are in good shape, then, use your brake to slow down. Remember not to lock up the track, just like a car on an icy road; "work" the brake. Run down to an open area, swing around, up hill and take another run at the hill, using your previous trail to gain traction and speed. The field training will be necessary to understand this completely.
Pulling a trailer (pup-pull sled or toboggan) uphill in powder is not recommended. If your group needs to haul equipment to the site a hard trail can be made, doing several passes (disconnect the trailer) to make stable path to pack down the snow, so the one pulling the pup (pull trailer) sled does not have to deal with turning out. In extreme cases where the powder is deep this may not be possible. Equipment, to a small degree can be tied on the rack on the sled, and/or a backpack can be used. Heavy backpacks might be distracting and hamper slidehilling and turn-out capabilities however, there is a well argued point some items should be carried in your backpack, such as a shovel and probes if in potential avalanche areas. Of course, your transceiver (beacon) has to be carried on your person at all times.
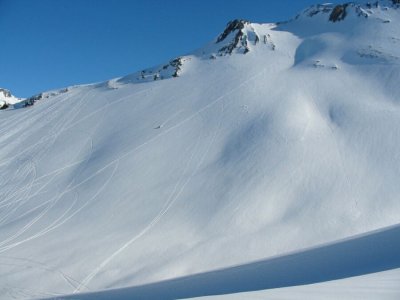
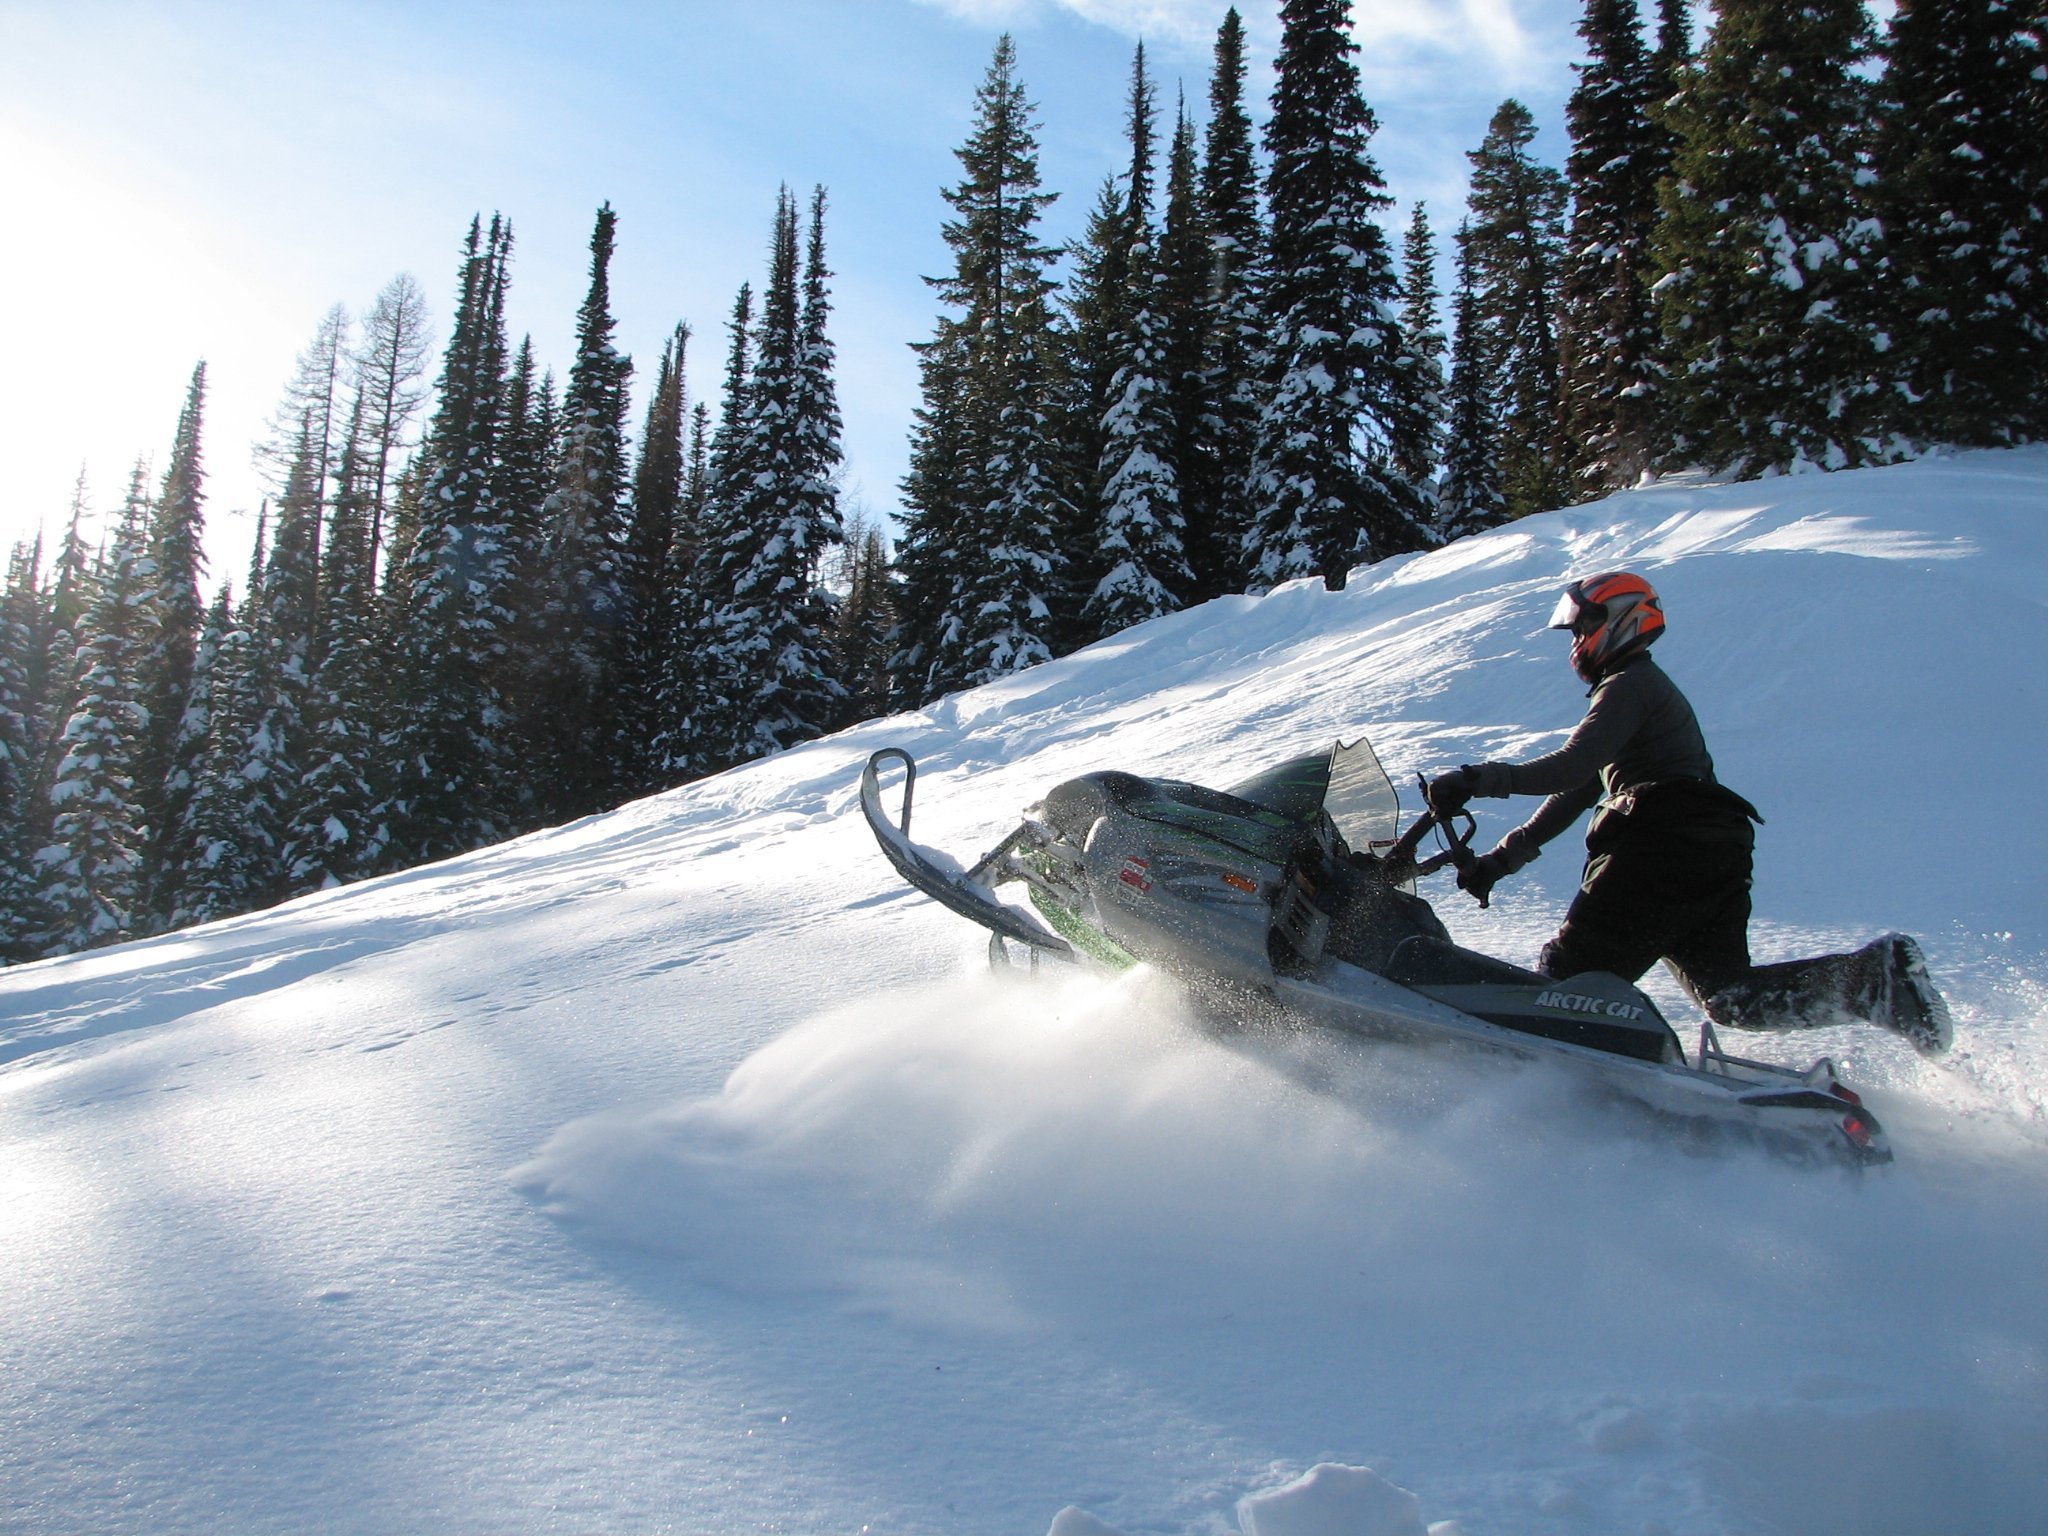
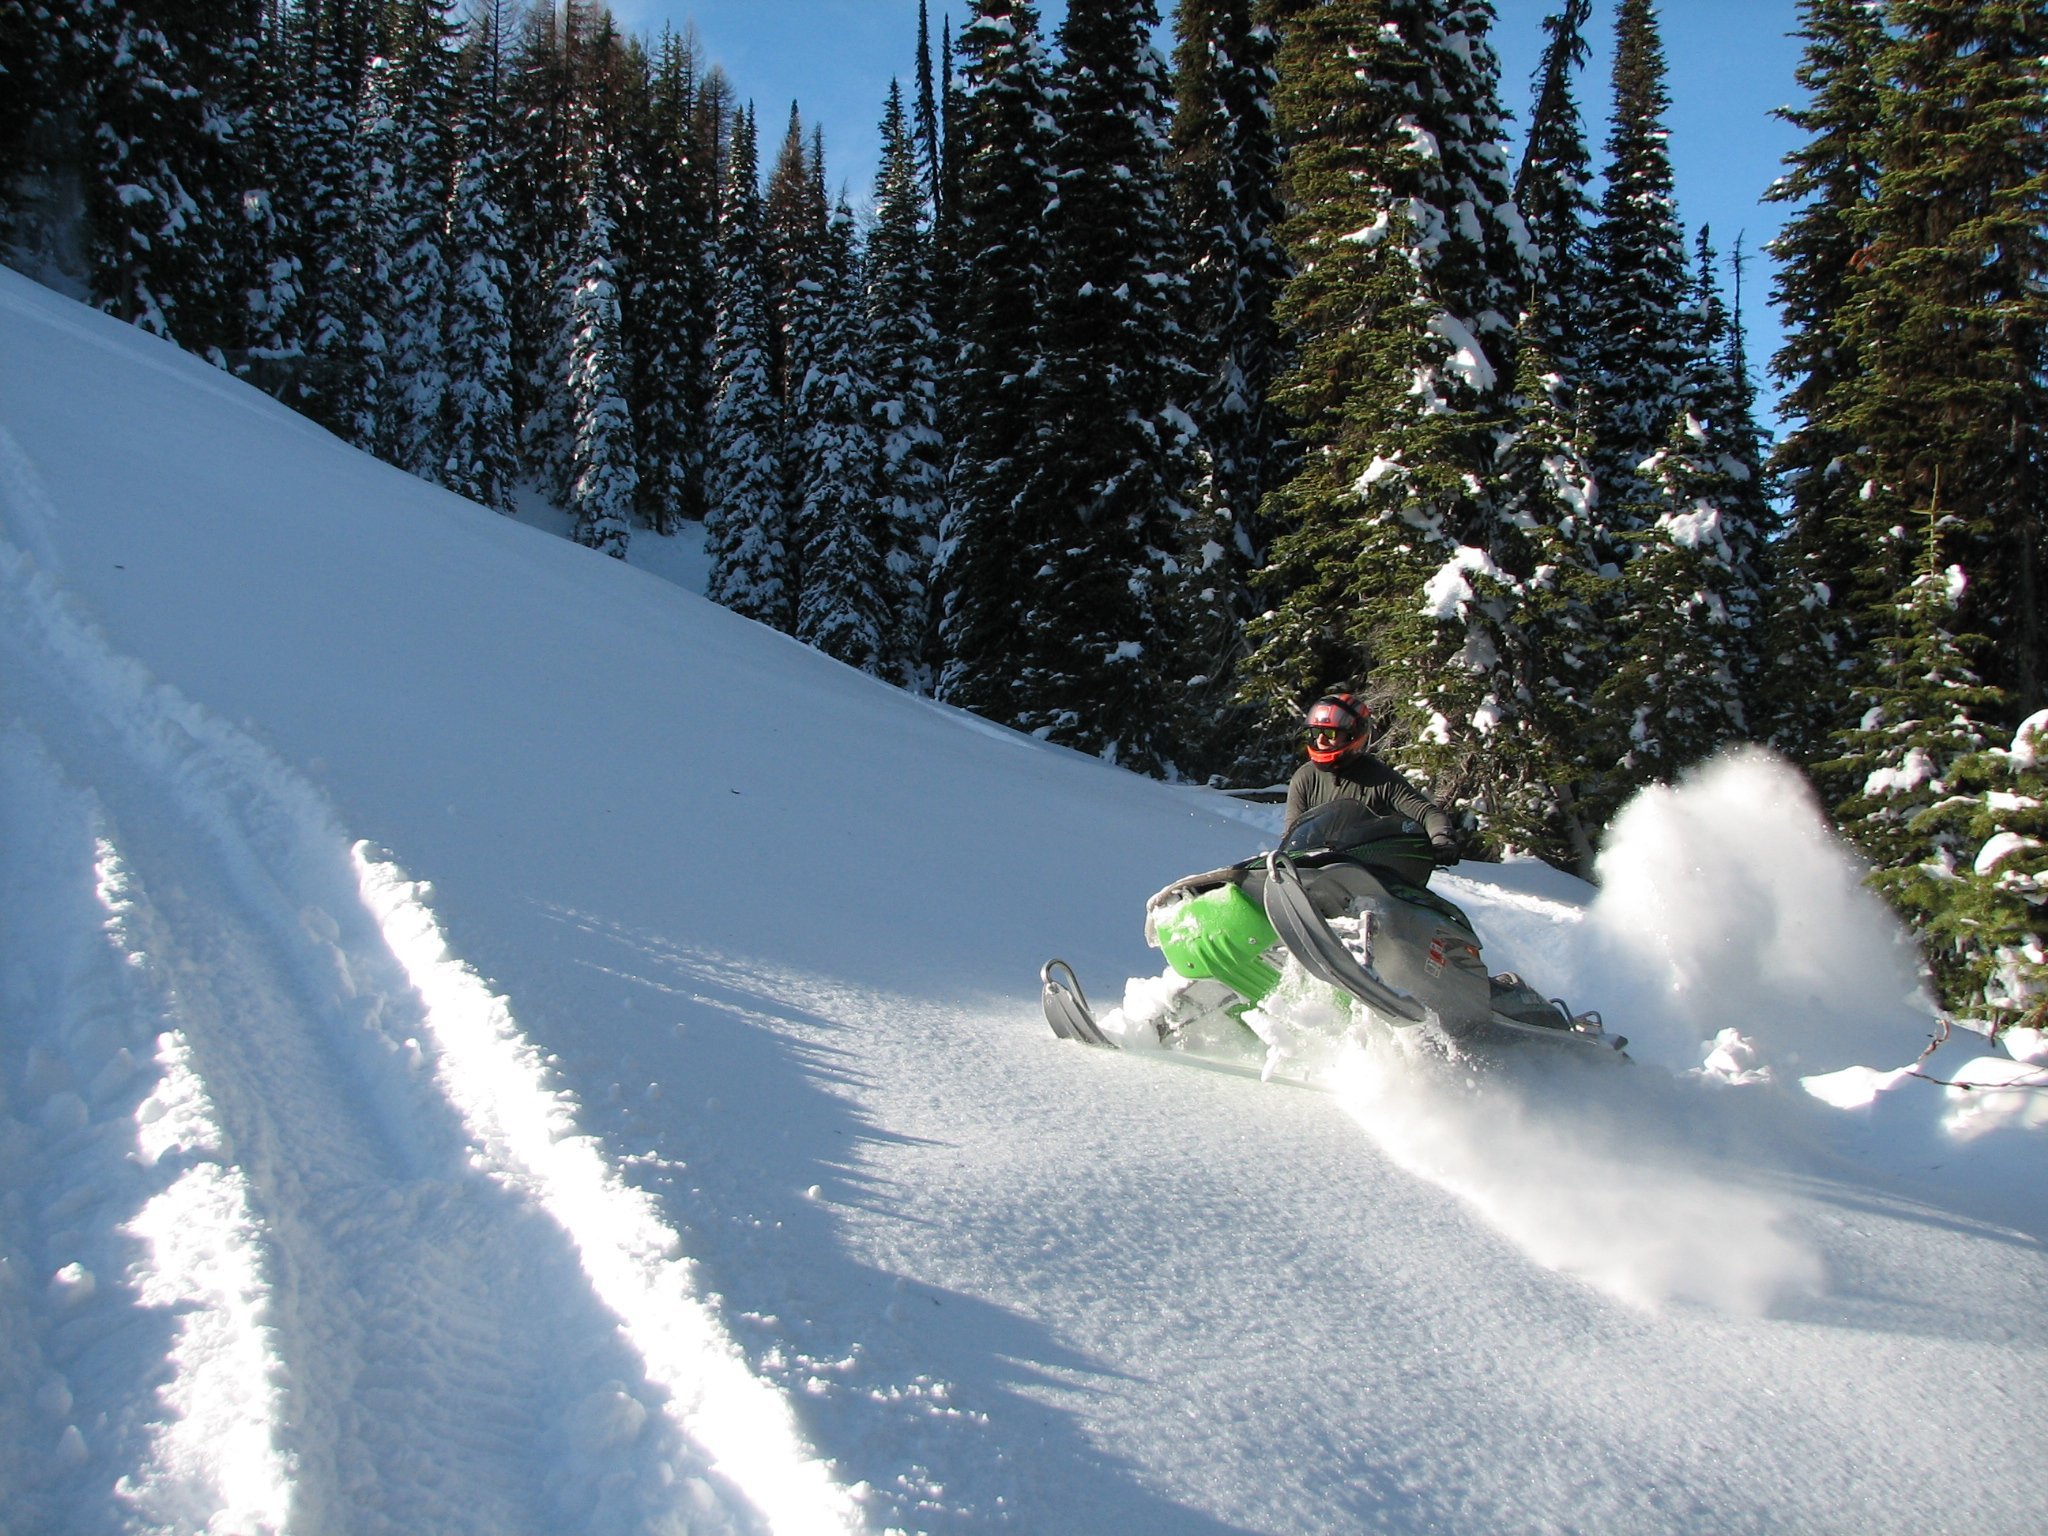
The pictures below are an extreme example of "recreational" "highmarking". Even though you normally wouldn't be doing this for work purposes to this extreme, they demonstrate this technique. Should you have a small hill to climb (10-100 feet) you could perform this successfully. In some cases, being the only way up to the top, this technique can get you there relatively safely, with practice. The other situation is that you need to check out the slide conditions.
This discussion is not to scare you; rather to make you aware that a situation can arise. If you ride long enough (over the years) you will see this. Therefore, few words about emergency situations are in order. This is above and beyond the usual precautions of taking a radio, or cell phone and checking in with someone. Most maneuvers are harmless and time consuming, mostly (getting stuck). Once and a great while you might encounter some situation more severe and have to make a quick decision. This comes with experience. Another alternative is take at least one experienced rider with you. Do not have all "novices" on a ride; one leading the other is dangerous. If you are new, take the easy routes (if any) and let the more experienced riders make those "nasty" trips to the hill, until you get more proficient. Having said that sounds hypocritical. What this means is to do small steps in learning. Yes, push your self some but not too much. Try small climbs and marginal areas (with supervision) to build up your competence and confidence. You must have both qualities to handle marginal situations.
Remember, these sled(s) are your way in and out of the site. A sled can travel 5-10 times faster and much easier in deep powder, then walking in it. You will find this out while walking around in the stuff. If you should get into a dangerous riding situation, you have two basic choices, one to ride it out. This only comes with experience, and is not an exact science, as there may come a situation no one is prepared to encounter. The other is to "abandon" your sled, by jumping off. This should ONLY be done as a LAST RESORT, if a life threatening situation comes up, such as going off a cliff, or uncontrolled speeds, etc. Either way it's not only going to hurt you by jumping off, most likely you will loose your sled, to some degree. If you are lucky it will crash lightly, enough to make repairs to get you home. In other cases it will be "totalled" and then you will have two other HARD choices; to walk out, or stay the night, until help arrives. You might be able to ride double out, with your partner however, this generally only works on trails, or going down a gentle slope. Most mountain sleds are designed for one rider and by doubling up can damage the seat in some models that use styrofoam for support in the back. One alternative is a rider standing on each running board. One operates the throttle while the other can do the brake.
Winter survival training can really make a difference in this case. You have several safer choices with survival training and a cool head. If you have none, you should not be out alone. Remembering how the mechanical parts work with your sleds, only a couple conditions would be catastrophic. If most anything breaks you mostly likely can come to a safe stop to check things out and make repairs, if possible.
When going up or down a steep hill, only two critical items would be dangerous, and that's either the drive shaft or chain breaking. The former will, in most cases, cause the track to lock-up and causing you to loose braking control. If the slope is not too steep, you will just come to a stop. The one bad situation known to all experienced riders is, if the chain breaks. In this event you would have NO brake, only steering. This is because the chain also is between the brake and the track. If you are doing a hill climb you will stop and most likely start to go backwards, down hill. You only have a short time to determine this is the case, by trying the brake, otherwise, the only recourse is to abandoned the sled, as discussed above and deal with the results of the sled's path afterwards. You are more important than the sled, so in this case, SAVE YOURSELF. Riding more than 30 years, representing about 8,000 miles of mountain riding, the Author has witnessed only two minor mis-haps; none requiring immediate medical attention. There has been some close calls - saved by experience on handling an emergency situation.
Putting slides and mechanical failures aside, the only other common problem with hill climbing is coming back down in "fast snow". During mid-season, with cold snow, either in soft power or hard crust conditions are usually safe for going downhill. Late spring/corn snow riding conditions can be way different. This was discussed earlier in using your sled's brake while parked on a steep slope. This type of snow will make what otherwise would be a boring, easy hill climb somewhat challenging. This is because the snow is like shaved ice, with little or no traction, thus, called "fast snow" on the downhill run. With plenty of speed and horse power it's easy to get way up high on a climb. However, there's a potentially dangerous trade-off on the return trip, back down. Twice, this type of snow has almost been a disaster for the Author and therefore, wishes to pass on awareness for those who have not had this happen. Corn snow makes it hard to miss "bad" things, such as rocks, trees, or even worse, cliffs. You get going too fast, downhill, sliding on a bunch of "ball bearings", which makes braking impossible and steering almost the same. Occasionally, you run over the top of that cool drift (going up), but have a chance of going over heals, with your nose in the snow, and tumbling down the hill. This might make up serious injury and definitely a wreak of your beautiful machine. Just be aware of the conditions and your limitations when trying anything like this.
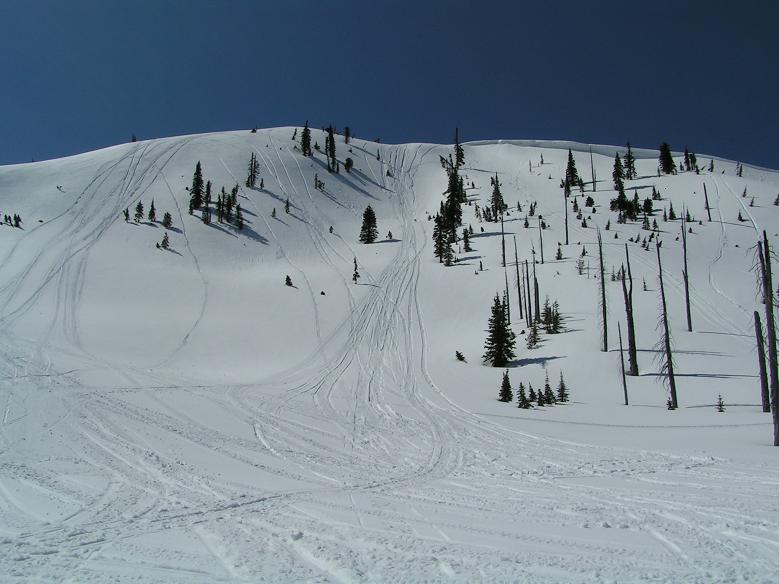
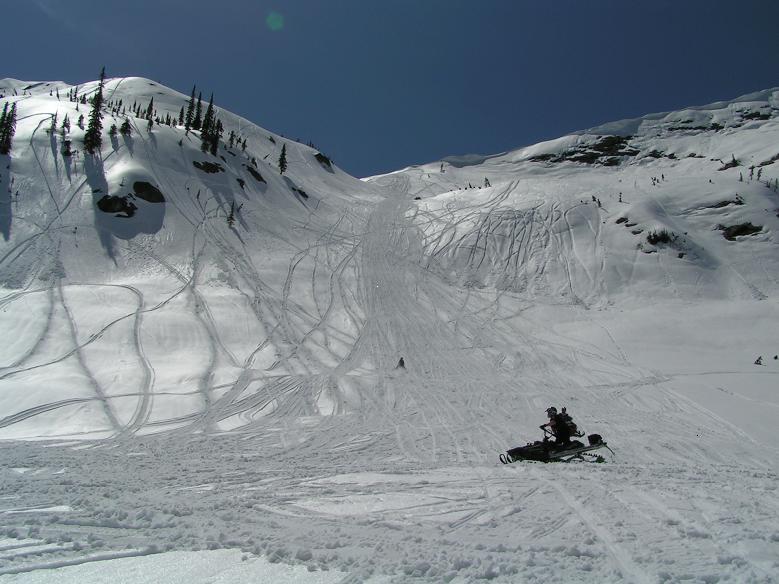
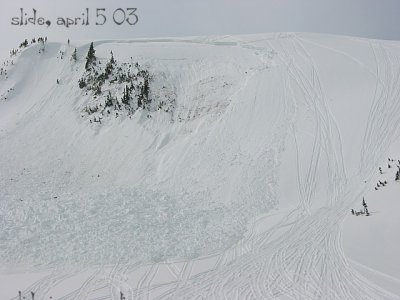
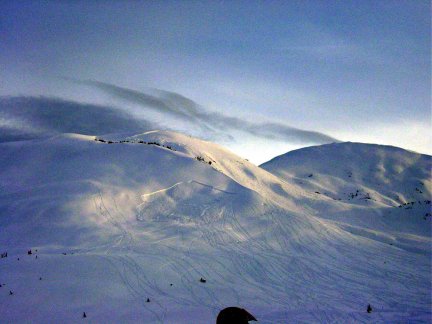
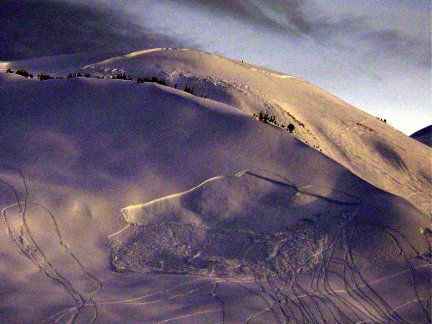
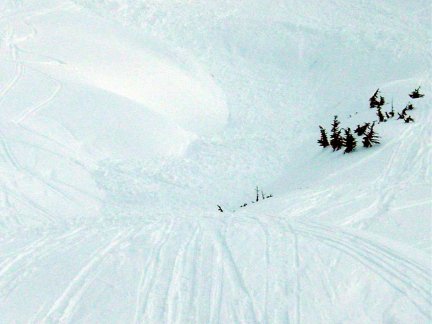
Remember reading the previous section about high marking? If you do not asses the conditions that nice, innocent slope (left picture) can turn into a deadly situation. (right picture). These are real pictures of real slides. Please believe that they do happen. However, a lot of these situations are preventable. Put away your ego during this time and use some common sense.
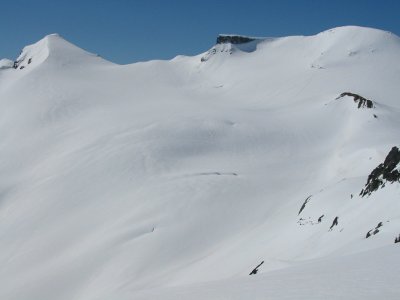
While riding in deep snow and near 30 to 45 degree slopes, you need be aware of avalanche danger. This is a general rule; there have been exceptions in other angles. A common "slide" can change that nice fluffy powder snow to "concrete" sliding down anywhere from 20-150 mph, depending on several variables, such as slope and size of the slide. This is partly due the moving snow particles cause friction and heat thus, warming up the snow. When the slide stops, it re-freezes into "concrete" type snow. Very bad situation. This is why the training suggests you to create an air/moving pocket just before the slides stops; that may be your last chance to do so, until you are found-hopefully alive. Not all areas are prone to slide at any given time; the safety of a given slope depends on many factors. For whatever reason, if you are in an avalanche prone area (escape, rescue, lost, etc.) there are several ways to decide whether to proceed or find a different route. While the details of these methods are beyond the scope of this training, some basic things you can be taught to do are:
If you attended avalanche training you will be familiar with the methods, in evaluating the snow (slab) conditions and proper use of an avalanche transceiver (beacon). If you are not trained in avalanche awareness the best advice is avoid these areas or get experienced personnel to perform the trip.
Here's some pictures of a typical open area and what can happen, under the right conditions. They were taken from a distance, therefore, the area looks small. The slide was over 100 feet wide and the slab was over a foot thick. That's a lot of snow coming down !

Your clothing should contain no cotton items, especially inner clothes layers. NO JEANS ! So many times the Author observes riding buddies and co-workers with jeans or other cotton items on. The rational is the outer layers (bibs, jacket, etc.) will do the job. While they offer protection wearing cotton under neath almost defeats the purpose. Another problem is the rational that one can add "good" layers when getting cold-by then it's too late. Do yourself good and leave all the cotton items at home, for summer stuff. Cotton feels warm while dry however, while snowmobiling you will get wet from the elements and body perspiration. When that happens you will feel cold and clammy. There has been cases of people found in the Cascade mountains above freezing but dead from hypothermia from wet (cotton) clothes.
When shopping for winter clothing pay close attention to the tag or the web site's description on what the material is made of. Look for the artificial fabrics and discard anything that list cotton, even partially. It's also a good idea to check out washing restrictions, if any. It doesn't do well if you have to make a run to the "dry-cleaners" for every outing. The Author finds friendly washable clothing and does so in luke-warm water and woolite. Hang dry is the easiest on fabrics. Sometimes it's unavoidable (next day outing) and you have to use a dryer. Check it several times during the drying to avoid melting and destroying the fabric.
Layers are best started with non-cotton "long johns", such as the poly (wick away) type. As an option, two layers of socks are good, with the first pair being thin, then a thicker pair over the top. When sizing your boots take this into account. Bibs and a jacket are very common with snowmobilers. One-piece suits in many conditions is the best protection against the cold and snow getting down your back. One downside to the one-piece suit is you have less control of regulating body heat. These suits can become very warm in bright sun and spring conditions. If you choose to go with the one-piece and happen to strip off the top end, make sure you tie off the sleeves. If they get caught in the track it can pull you off without warning and cause injury. The Author has and uses either type depending what part of the season the ride is.
Some words about helmets. Over the years the author has only worn only a hat or furry top. Most of the travels have been at less than 20 mph. With technology increasing sled performance and speed wearing a helmet has become necessary. They provide fair protection against a hit (tree branch) and the cold wind. A "balaclava" provides addition cold protection. It's like a head sock, usually made from fleece and is inexpensive. When sizing your helmet take this into account. When boondocking in the trees or brush it's a good idea to maintain eye protection. Either wear goggles, sunglasses or have your face shield down. Sometimes twigs or branches can wack your eye if you are not watching out. For ideas you can do a "goggle" search off the internet, or from the Author's recommendations. Explain MORE .
Any "challenges" should be with a helmet.
Winter Survival
Until now it's been discussed snowmobile riding, playing and returning home that afternoon. What happens if you break down, someone in your group is injured or lost (then found) from the group and it's getting dark and a storm comes up? There is the small possibility you or your group will need to spend the night out in the snow. With all the proper clothing covered (no pun) earlier, you may need a couple more items to do this successfully. One is bring survival items (list to follow), while the other is YOU and your cool head. People do strange things when scared, panic and not prepared for winter survival, including setting their equipment on fire to keep warm, for example. VERY BAD choice and would ruin options to get out the next day. If you go nuts and panic you may not have to worry about the first item that you could very well kill yourself and endanger others in your group. So stay calm, talk with the others in your group on a plan for a shelter and other resources you and your group brought with them.
Based on your experiences and thinking ahead, add your items in the lists. Remember to use number 1 tool; YOUR HEAD ! For example, make this into a camp-out with your buddies. There is professional help and classes on winter survival, including making temporary shelters, such as snow caves, how to keep breathable air going for you and your buddies, as one example.
Up until now you've read on what to do for various situations. Be pro-active. Think of the "what-if" situations. Bringing the right equipment and tools is important, too. We covered Avalanche equipment and mentioned a shovel for getting you out of a stuck. There may be some other items you want to consider for a "just-in-case" situation. Some of it might sound stupid or weird until you think about it. Obviously, for mountain riding weight is a consideration so you'll have to decided on priorities and storage limitations of you sled and backpack. Here's a good list:
For the nice day, just playing in the snow for the day:
In addition to the above items; For the occasional simple "fix" on a minor problem with your sled:
In addition to the above items; For when the crap "hits the fan" and you are in "do-do"
In addition to the above items; For when you have to stay the night or get emergency help:
It's recommend to read the Snowmobile Owners's Manual at least once, paying close attention to the operation and preventive maintenance. Following the instructions can really save you a headache later, on the hill. Other than a wash or cleanup after a trip the only real maintenance needed is the one grease (zerk) fitting for the spedo cable adaptor. The outside of the drive bearing is exposed to the wet snow in this model. Therefore, after each trip, the Author recommends pumping in new grease, which pushes out most of any water to the tunnel side. You can get down and look upside the tunnel to see this. The other grease joints usually can be done every few months or 3 trips which ever comes sooner. This would include for mentioned spedo adaptor, the jack bearing, the 5 fittings on the rear suspension and the 2 on the front suspension spindles. For other models of sleds these grease points may be different. A rag is handy to wipe off the excess coming out of the joint cracks. The Author prefers to use the grease gun with the one handed operation and the flexible hose to get into all the fittings, with the exception of the jack bearing. For that one you need to loosen once side of the air box to tip it away a little to get to the fitting.
As you learned, two cycle engines depend on the oil injection to lubricate the piston rings, rod and main bearings. This oil also protects the engine inside surfaces against corrosion (from condensation and other factors) up to a certain point. The engine should be ran about 5-10 minutes (depending on outside temperature) to warm it up, at least once a month. During the winter trips this happens of course, however, long term storage, such as in the summer can loose this protection.
For summer storage two main items should be performed. The gas treatment and engine fogging (oil). Both can be performed at your dealer. You can stabilize the gas or drain it completely. Obviously, the former is much easier. If you choose this way add gas stabilizer in the tank, per the bottle's directions. Then run the engine about 5 minutes to get the stabilizer into the fuel injectors and manifold (or bowls in carburated engines). Remember, there is no cooling from snow, so don't run the engine too long. You can check its progress by feeling the heat exchanger in the back. It should be just starting to get warm, indicating the coolant is circulating properly. Then "fog" the engine, by squirting fogging oil into the intake throttle bodies for 5-10 seconds, or until the engine starts to bog, then immediately turn the engine off. For some additional protection the author likes to pour a little oil down inside the plug holes, then pull the engine over by hand (rope) once slowly, then spray a little inside (to hit the cylinder walls) with the fogging oil as well. Replace the plugs, loosely, unless you don't plan to inspect the cylinders later in the summer. You then should plug up all the ports to resist mice infestation. Mice eat through anything, except steel wool. Steel wood works real well, however, to prevent any wool shavings getting into the engine (bad thing) the author stuffs the wool inside (latex) painting gloves, then stuffs the gloves in the intake and exhaust ports (tail pipe). Don't run the engine after this, until next season. Battery long term storage/procedures would also apply in this case.
For the opening season, remove all the steel wool plugs, fill the gas tank (if was empty) and tighten the spark plugs to spec. (if not already in the spring) Install/connect the battery, if this applies. Then start the engine. In carburated engines you may have to pull over the engine several times. If it's hard starting you can pour a little (1-2oz.) of gas inside each plug hole to help. Once up and running you will need to replace the (fouled) plugs after all the oil clears and the engine is running at operating temperature. Again, monthly (or more) running is the most easy way to keep things running and protected. If possible, raise the sled for storage. Raising the track is also useful when test running the sled (i.e. above prep) or for warm-up at the start of a day when temperatures are sub-freezing. This keeps belt wear down as well. Raising the front is good for working on the steering system. For summer storage they need to be keep out of the sun and covered. The best way is inside a building, or at least an enclosed trailer.
We have a couple of short films here. Your PC needs to have the latest media driver/plug-in installed. If your PC is not current you will be prompted to connect with the Internet to download them. Most updates are on Microsoft's web site. If you choose not to do this, just skip this section.
This is a rather large
slide with some riders below, in the picture. Hopefully, this will give you an idea how fast the slide can go, and don't think you can out run a slide. You might be lucky enough to do this if you happen to be near the outside edge and know what to do. Most of the times you will get sucked under several feet down. Please don't be scared or alarmed, but if you are in a large slide you can be beat-up pretty bad (hitting rocks and tress) knocked unconscious, or even buried. If your buddies do not find you in a few minutes you will not survive. The point is don't be scared, just be aware and use common sense, to avoid a slide. After you click on the movie, your multimedia window box will start to play the film. During this time you can run "full screen" by hitting alt+enter. This is a toggle on-off feature. The next film is a "sales demo" film about another brand of snowmobile.
A little disclaimer here:
It's the only demo the Author could find without the trashy music and useless (crazy) stunts of "kids" jumping
over ridiculous and dangerous obstacles.
Being a promotion film it will have all the fancy editing, music, graphics and professional riders.
Most brands of Mountain Sleds, including the ones we have, all perform in a similar fashion, therefore, this is a good example of what modern
high performance sleds (of any brand) are capable of doing.
Please keep in mind; for utility work these maneuvers are rarely performed and require lots of practice.
Pay close attention to the way the rider can shift his weight to compensate for sidehilling.
Sidehilling may be necessary in the event the normal road is drifted in or an alternate route is required for travel.
For utility purposes, sidehilling can be performed at slower speeds than shown on this film.
The sleds shown here are from the late '90's tecnology. So, without further delay.........
Click
here
With practice you can be enjoying the ride, too, on your days off, just to play in the nice clean white stuff.
The author hopes this presentation was useful in understanding modern snowmoblies.
Have a nice day, and watch out for those microwaves !

semi-professional/recreational snowmobiler.
The fine print
Disclaimer: Snowmobiling in the mountains may expose the rider to occasional risks. By reading this document you assume responsibility of you and your companions actions, which, in some cases, could expose persons doing such, to possible injury or death. The Author assumes no liability or responsibility towards the reader's actions of such activities while snowmobiling in the mountains. This document is for information and education only. No part of this document may be printed, reproduced, copied or otherwise modified without the Author's written permission.
![[Karl's sled page]](images/winter_home3.gif)