Using 1 1/2" tubular steel with .120 thickness, it was built with a "U" shaped frame with three sides, leaving the front part open. Attached are several swivel casters, mostly 2 1/2" around the center to bear the weight and two 3" in the rear. Added is a small flat bar to secure the front (after loading) from warping out during long term storage and secure it with a couple of drop in 1/4" bolts. With the sled loaded it rotates extremely easy and rolls forward with some effort, but way easier than sitting on the floor. The color to paint it, was undecided, so for now, it's flat black. You could make some wild colors for this project, just for fun.
For the pivot point the author used smaller 1" tubing for the vertical support, glued and screwed some 2x4 wood blocking, covered with carpeting as not to mar up the under side of the running boards. They are angled just right for even loading as not to bend any of the running boards as well. Since the 1M's are lighter, one can lift the rear high enough to "scoot" the rack underneath (on wheels), then let the rear down on the rack, with most of the weight at the pivot point. If tired, there's a late version lift (see bottom picture) that can hold the rear and front (one at a time) and operated by a even a small person. Since the rear bumper is strong front the reinforcing project lifting is not a problem on it.


After the pivot point is positioned, it's easy to lift the front end and slide the belly pad (also covered with a piece of carpet) underneath. I drilled some holes and hung a couple of 1/4" bolts, in case I needed to secure this piece. So far, rolling around the floor is stable enough without them. I also made the rear section long enough for most any track length I might encounter.


The left picture shows without the front (flat bar) brace installed (but the bolts are sitting in the holes). As you can see there's enough clearance to run the track and work on the skis as well. Another little feature: if you leave the front support out, you can "rock" the sled/gas tank enough to mix gas stabilizer for summer prep. In the fall of 2006 the author changed the rear support points back to the point of the tunnels upper suspension. The thought here was to the fac the tunnel's rivets were loosening and it was suspected the tunnel hanging "low" (instead of "high" when on the ground) was contributing to the problem. Therefore, they've been moved back. The only disadvantage is a lot more weight appear on the front end, if you are lifting it up. For that the (next paragraph) lift rack is to be used with this newer arrangement. Not as fast as the older way, but easier on the sled's tunnel.


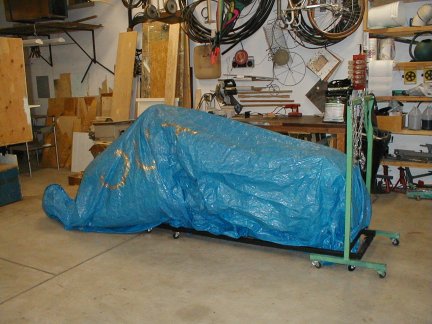
The entire assembly can be easily covered with a tarp to keep the dust off during the summer. The author uses a cloth on the front part so the plastic tarp doesn't scratch it. I only use a plastic tarp if in a temperature stable area to prevent condensation and rust. That paint saying "out" tells me that's the "dusty" (outside) side of the tarp. That green rack you see is the author's latest version of a lift. It's built it so even a small person can lift several hundred pounds. It also rolls around on the floor and has two loops made out of seat belts, so you can loop them into the sled's bumper as not to mark up the plastic with the steel hooks. The loops attach to a hook which attached to chain, which slips over a stud on the top, for easy height adjustments. Not including the tarp and lift the summer rack costs around $50 in materials.
Back to Projects page
![[Karl's sled page]](images/winter_home3.gif)